As an amazon associate, I earn affiliate commissions from qualifying purchases.
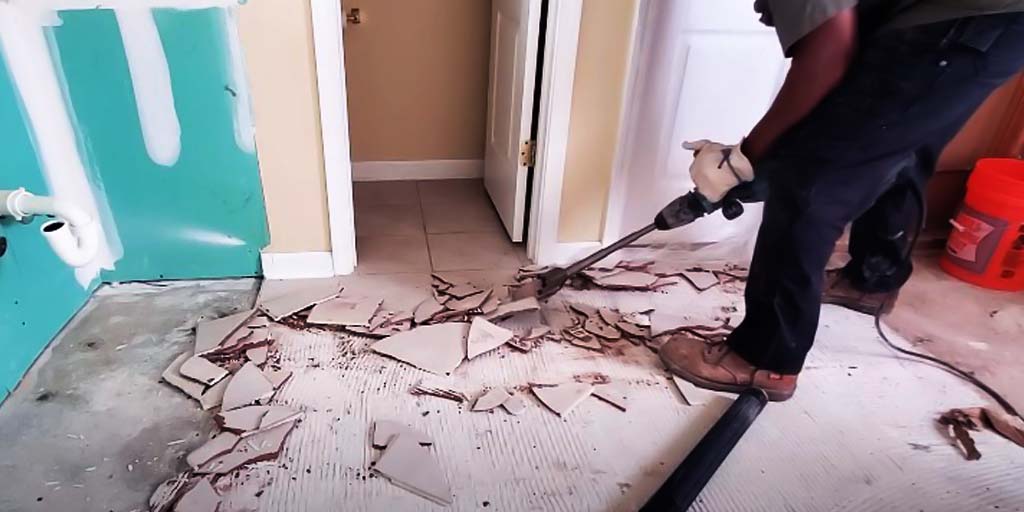
How to Use a Demolition Hammer to Remove Tile
Removing a tile can be a hassle sometimes during renovations. While there are different professional tools that can be of service, some traditional tools are always the best way to go!
As such, knowing how to use a demolition hammer to remove tile can be pretty convenient. You won’t have to spend a fortune on high-tech machinery that requires the understanding of complex mechanisms.
So, if you are interested in knowing more about this useful and handy method of removing a tile, you are in the right place, for sure!
In this informative article, we are going to be explaining to you the ways to use a demolition hammer to remove tiles from your house floor. Sounds interesting? Let’s hope into it then!
Preparing for the Removal Process
When it comes to demolishing or simply renovating literally anything in the world, the wisest way to christen the process is to start by prepping.
Sure, removing tiles is not any big deal (that is, to some cold-hearted people out there), but your main priority here should be to get things done as smoothly as possible.
Because come on, if we wanted to really mess shit up here, we’d simply tell you to get a heavy hammer and start bashing the wall to remove the tile.
However, a true DIY-er, or whatever your profession is, will want to keep the damage to a minimum and amazing results to a maximum. If you’re one of us, you will start by prepping the area for the final operation too.
Step 1: Get Rid of Fixtures
First and foremost, you must remove all kinds of fixtures in the area. This means getting rid of faucets over tiles, switchboards, etc.
If you are going to be de-tiling in the kitchen, we would suggest you first do a routine check for pipes and plasters first. You seriously don’t want to puncture the geyser pipe here.
Step 2: Turn Off All Electrical Outlets
Worst case scenario- you get electrocuted while de-tiling. If that isn’t your ideal way to kick the bucket, then take our advice and turn off all outlets. Heck, go ahead and turn the main power supply off for better safety!
Trust us, using an extension cord for the demolition hammer might seem like hard work, but it is much safer than compromising the safety of you and those around.
Step 3: Suit Up
No, don’t go ahead and put on your best MCU costume. But, maybe wear some shades, mask, ear pads, and gloves instead? These might not give you superhuman strength, but they will protect your eyes, ears, lungs, and hands from the dust, god-awful noises, and flying debris. Your body will thank you for it.
Easiest Way to Remove Tiles with a Demolition Hammer
Read ahead if want to know how to use a demolition hammer to remove tile without necessarily breaking them in the process. This method is one of the best and simplest to attempt on by anyone, so it’s bound to help you get things done like a pro.
Chisel-Attachments
Say you want to remove those ugly tiles without actually damaging the mortar beneath. How can a demolition hammer help you here?
All that you will need here is to attach a chisel attachment (also known as chisel bit) to the hammer. This scraper-like item can be found in many different sizes and widths, therefore making it one of the best and simplest ways to remove tile when coupled with a demolition hammer.
Even without the hammer here, you could easily just use the chisel to remove the tile, but who has the time and energy for that? Having a demolition hammer in your inventory will fasten things up while also resulting in a cleaner, smoother finish.
However, note that you will have to choose the appropriate chisel bit/attachment based on the demolition hammer that you own. Don’t go ahead and purchase whatever chisel you think is best.
The Process
Now that you know which method is the best way to get rid of dirty, old tiles, let us take a quick look at the final process!
Wide Chisel-bit
Firstly, you should equip your demolition hammer with the right chisel bit and ensure it really is stuck to the equipment.
We always suggest going for a wide chisel-attachment, as it has the most comfortable size and width to work with (especially for beginners). Wide chisels are great since they can usually fit into any gap between the tiles and cover a substantially large area at once.
Perfect Angling
Next, place your hammer in a way that the chisel-attachment makes a 45º angle with the tile(s) in question. You do not want to go straight ahead with the tile here, as that can simply break the wall.
Remember, you should be trying to de-tile the wall with your demolition hammer here, not puncture through it instead.
Having your chisel-bit in an angle will allow you better control over the equipment while also helping you get used to the awkward vibrations if you are a newbie.
Chisel Mode
Once you have got yourself and your hammer positioned, turn the baby up and work horizontally.
A demolition hammer usually comes with two distinct but somewhat similar modes that you can use to remove tile. One approach being the chipping mode, and the other which you will be using to de-tile the wall: the chisel mode.
For obvious reasons, the chisel mode is paired up with chisel-bits/attachments, as the operation makes use of sharp edges to remove tile.
On the other hand, we have the chipping mode, which is basically used in certain regions where you want to remove a specific tile. This mode is not used to get rid of an entire tile, or multiple of them for that matter.
Minimum Power
This process is seriously the easiest, so we don’t see any reason how you can possibly mess it up.
Unless you want to go right ahead and sabotage the entire process, just make sure to take things super slow (especially if you are a beginner) and amp up the power as you go.
Starting off slow and light will also help you get accustomed to the vibrations of the demolition hammer while also allowing you to note where you need to put more pressure.
Aftermath of De-tiling
Once you are done with using your demolition hammer to get rid of all those tiles on the walls, your next job will be to remove the mortar. You can actually use the same chisel-attachment for this removal process too.
However, you can opt for a thinner and smaller chisel-bit here if the amount of mortar on the wall is to a minimum.
After finishing off with the nitty-gritty, you can go right up and dust off the remaining debris from the fresh, bare walls.
Final Words
By this time, we are certain you are fully skilled in how to use a demolition hammer to remove tile. Not yet? Well, with just a little practice, you will surely get there.
We hope you found this article helpful and informative enough. Have a great time renovating your house!