As an amazon associate, I earn affiliate commissions from qualifying purchases.
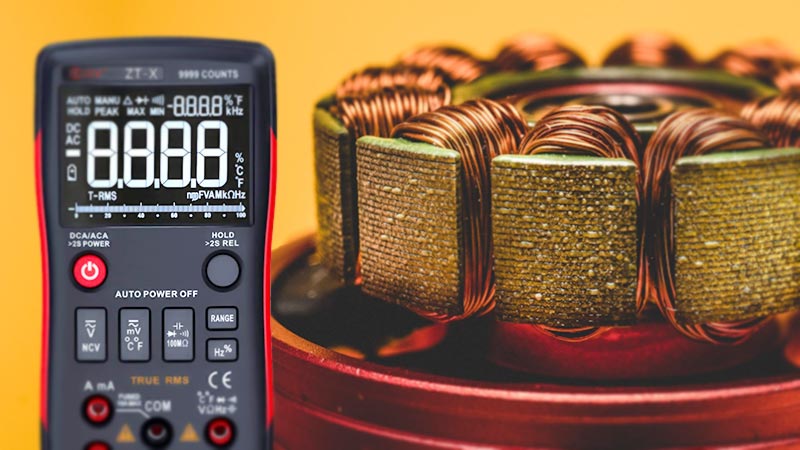
What’s a Stator? How to Test a Stator with a Multimeter?
If your bike isn’t functioning like it should, you probably should have a look at the stator. It’s easy to test and even you know that too. All you need is a good-quality multimeter. We repeat… ‘good quality multimeter’.
We don’t know if you have the perfect multimeter or not; however, you can get the best multimeter under 100 dollar pretty easily. With it, you’ll be able to test your stator and see if it has any fault. If the stator has issues, you won’t be able to run your bike.
Now, simply having a good-quality multimeter won’t do the job, though. If you don’t know how to test a stator with a multimeter, chances are you’ll have to hire someone else to do the job for you.
Why waste money on someone else if you can solve the problem all by yourself? We’ll tell you all the how-tos.
What is a Stator?
A stator is one of the components you will find inside a motorcycle that will generate the power it needs to run. It goes inside the motorcycle engine and is a circular shape piece with a coil of wires.
The part will have a wire traveling through the engine case itself and connect to a rectifier. Now, the job of the rectifier is to convert alternating current to direct current.
You can see then why it’s quite important to have a working stator. Sometimes these do go bad, and you will need to do some tests to evaluate that they are working well and won’t have problems down the line.
Having a faulty stator inside the engine is no good by any means. You would mostly use a multimeter to test the stator. There are a couple of tests experts will perform on a stator with the help of a multimeter. Here is how to test it.
Testing a Stator
Testing the stator is mostly recommended when there is some sort of charging issue. This is where you need to bust the multimeter out. You can just leave the stator inside the motorcycle and use a high-quality multimeter to test it.
Voltage Checks
The first check of the day is the voltage check.
Step 1 – Prep Your Multimeter
Prep your multimeter by setting it to DC. This is to make sure you get the correct reading.
Step 2 – Test Your Battery Voltage
Now, check the voltage reading of the battery. Your battery should be putting out a reading of at least 12.5 volts. If you don’t see this, you might need to install a battery charger in that case.
Dynamic Output Tests
Another common test performed is the dynamic output test. With this test, you’ll be able to check if the rotor is running fine. The rotor comes with magnets. They will be spinning around the stator.
Step 1 – Prep Your Multimeter
This time your multimeter needs to be set to AC voltage. All you need to do now is to connect the probes of the multimeter to the stator sockets.
Step 2 – Rev the Engine to Get a Reading
Now, you need to rev the engine with the multimeter connected. Revving the engine is crucial here. Make sure to rev it up to 3000 RPM. Take a reading from the multimeter to see if it’s working okay or not.
You’re looking for reading above 60 volts. Any lower than that, it means it’s time to change the rotor for good.
Step 3 – Testing the Regulator Rectifier
The next step is to check if the regulator rectifier is okay. For this, connecting the bike’s stator to the rectifier is important. Your multimeter should be set so that you can check the amps that go on the lowest scale.
Once done, you can start the engine and then turn every electrical accessory on. The negative cable of the battery needs to be disconnected, by the way. Insert the meter probes in such a way that they stay in series and goes between the battery negative post and also the negative terminal.
If you happen to get a reading of below four amps and all the other previous checks turned out okay, you will need to change the rectifier at that point.
Static Stator Tests
Static stator tests are one of the most common ways to check if a stator is good or not. One important thing to keep in mind when doing this test is you need to turn the engine off. This test helps you figure out if you have a grounded stator or whether just one that needs to be replaced.
Step 1 – Turn the Engine Off
Just for extra due diligence, we will mention this again. Make sure to turn the engine off to be safe and get a proper reading as well.
Step 2 – Prep Your Multimeter
The next step is to prep your multimeter. You need to make sure it’s set to either Ohms or Resistance. Whichever you set it to, double-check that it’s set on the lowest scale as well. This bit is very important.
Step 3 – Insert Probes
Insert one of the multimeter probes inside the pin sockets of the stator and touch the other probe you’ll find to any chassis ground. If there is any form of continuity or displays a symbol for open or shows an infinity sign, that means the stator is grounded and needs to be changed.
Another test is to stick both the probes inside the stator socket and check the reading. You should be getting a reading of between 0.2 to 0.5 Ohms. If there is a lot of resistance or it shows you the infinity symbol, that’s a telltale sign that the stator is bad. Replace it immediately.
Visual Inspection
Lastly, you have to carry out a visual inspection. Of course, you don’t need any sort of multimeter for this test. Just carefully inspect for any signs of damage to the stator. You will need to take the stator out for this and completely expose it.
You’re looking for any thermal damage, broken wires, or signs of insulation breakdowns. These breakdowns will be on the coils for the most part.
Magnet pieces aren’t your friend here either. Make sure there are no pieces of magnets on the rotor. If you do see bits of magnets, the whole rotor needs to be replaced.
Also, check to see if you can figure out whether there is any form of contact with the rotor. Then, you can replace the stator as needed from there.
As you can see, a lot of these tests are there to check things one by one and narrow down on what the problem is. That’s the angle we are taking here. Once you can narrow down what is actually the issue, fixing it becomes much easier.
The Best Multimeter
There are many different types of multimeters on the market, but not all of them are suitable for tasting stators. The best multimeter for this application is a digital multimeter with a high input impedance.
You can use this multimeter to test the stator of an electric motor by connecting it between the two phases. If the multimeter detects any voltage while you are touching both wires, your motor’s windings or magnets are faulty and need repair.
Check out our top three multimeters for tasting stators and many other applications:
AstroAI TRMS 6000 Counts Volt Digital Multimeter

AstroAI’s TRMS Digital Multimeter is the perfect tool for any job that involves tasting the stator. With its large LCD backlit screen, you can take measurements in any lighting condition, while the kickstand makes it easy to keep the meter stable when taking readings.
The auto shut-off and hanging magnet also make this multimeter convenient to use, while the true RMS capability ensures accurate readings every time.
With its double protection system and overload protection on all ranges, it’s more secure and reliable than ever. Plus, the built-in F400mA/600V and F10A/600V explosion-proof ceramic fuse tubes ensure that you’re always safe when using this multimeter.
Mastech MS8268 Digital Multimeter

The Mastech MS8268 is a top-of-the-line digital multimeter that is perfect for both professional and amateur use. It features auto and manual ranging, as well as relative measurement, making it easy to get an accurate reading no matter what you’re measuring.
The blue LED back-lit LCD display ensures you can always see what you’re doing, even in low light conditions. And best of all, the MS8268 automatically powers off after a few minutes of non-use, helping to conserve battery life.
The Mastech MS8268 is an accurate, high-performance voltmeter that can handle AC/DC voltage levels of up to 1000V and currents of 10A. It’s the ideal equipment for any skilled electrician since it includes a wide range of features, including frequency measurement up to 200KHz and capacitance measurement up to 200uF.
Plus, with the handy LED/sound warning system, you’ll never make another mistake when testing voltage again. And for those who prefer using banana jacks rather than alligator clips, no problem! The Mastech MS8268 has you covered there too.
Fluke 117 Electricians True RMS Multimeter

If you are looking for a premium multimeter, then the Fluke 117 true RMS multimeter is your best bet. With power quality analysis mode and voltage loss compensation, you’ll always get an accurate reading. What separates this multimeter from all other multimeters is the infrared thermometer.
It helps calculate surface temperatures based on the intensity of heat being radiated. This can be helpful when diagnosing everything from faulty wiring to overheating circuit breakers.
With features like VoltAlert technology for non-contact voltage detection and AutoVolt automatic AC/DC voltage selection, you’ll be able to work efficiently on any job. The large white LED backlight makes it easy to work in poorly lit areas, and the true RMS sensing ensures accurate measurements on nonlinear loads.
Plus, the operating temperature range of -10°C to +50°C means you can use this meter in any environment. And with up to 400 hours of battery life, you’ll be able to get the job done without having to worry about running out of power.
Wrapping Up!
Now that you know how to test a stator with a multimeter, we don’t think you’ll have much trouble fixing your problem. If by any chance, you think you don’t have a choice but to replace the stator, you should do it as soon as possible, though.